
Using a USB Yubikey 4 for MFA with Azure AD
- John Craddock
- Sep 12, 2018
- 2 min read
Updated: Sep 14, 2018
I have often been asked about how could we provide MFA for users were they either don’t have a phone or they are in area with no mobile signals – from my days of working in cages on the floor of a datacentre I know the problems.
One solution which I think is neat and elegant is to use a Yubikey 4, this combined with the Yubico Authenticator app gives you all you need.
Caveat: I can’t find any solid reinforcing documentation and consequently do not know if it is a supported solution. If you use it in your environment, it is down to you to check on support and security.
Update: Daniel Stefaniak from Microsoft point me to some documentation here
Update: The QR Scan is now working perfectly with the new security info UI experience. For details on the preview UI take a look here
Step 1: Purchase a Yubikey 4. https://www.yubico.com for details.

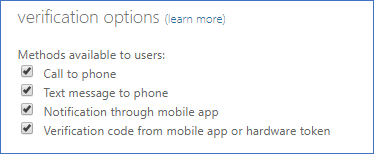
Step 2: In the Azure AD portal go to Users | Multi-Factor Authentication | service settings and enable " Verification code from mobile app or hardware token"
Step3: Install the Authenticator App from https://www.yubico.com/products/services-software/download/ and insert the key. You may need to restart the app after inserting the key.

Step 4: Make sure that the preview features for registering and managing security info (see the wrap-up below) are not enabled for the user. Send the user to "MyApps | Profile | Additional security verification" or via the direct link https://aka.ms/mfasetup to register their security settings.

Step 5: Select the Authenticator app and click configure, click on Configure app without notification and you will get a second QR code.

Step 6: Here's some magic, in the Yubico Authenticator App, click File | Scan QR code… If you watch really carefully you will see a scanner come out of your screen and snag the QR code. If you don’t believe in magic, shame, you could put it down to a screen scrape.

Step 7: Now that the credentials have been captured, confirm and save the settings, you will need a code from your authenticator. You could also choose the Yubikey as the default verification option.
Step 8: Use your new MFA option...

Wrap-Up
If you are using the new preview of the combined SSPR and MFA security registration, scan the QR Code and you are all set, see the screenshots below. When I first tested this the Authenticator would not scan the code, it now works perfectly.
I really must get on with preparing for my Microsoft Ignite sessions, I hope to see you there! Please follow me on Twitter @john_craddock and let me know if you found this blog post useful.

bos288, slot thailand, bos288, bos288, bos288, bos288, bos288,
slot gacor, bos288, slot88, bos288, bos288, slot gacor, slot gacor, slot qris,
link slot, raja168, slot gacor, raja168, slot, slot gacor, slot, raja168, raja168,
slot gacor, raja168, raja168, slot deposit dana, raja168, situs toto, situs slot gacor,
raja slot, situs toto, slot deposit qris, slot gacor, slot gacor, raja168, slot, raja168, slot dana,